


Soon some of you will be asked to write your annual ‘‘What I Did On My Summer Vacation'' essay. You know it as surely as you know that your trips to the swimming pool are numbered.
I can think of a few reasons teachers insist on a yearly accounting of where and how you spent your summer vacation. First, it tells them what you enjoy doing; the activities you participate in help define you as a person. Second, a handwritten report gives them some idea of where you stand scholastically and what he or she needs to teach you this school year to help you improve. Third, I suspect they may be fishing for some good ideas to help plan their own future vacations.
This year, impress
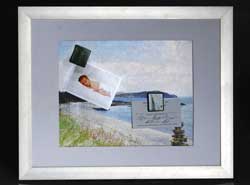
teachers and schoolmates by including a visual aid with your report. This bulletin board is unique because you can decorate it with an original photo of your family's vacation destination. It is unusual because it is magnetic, which allows you to hang notes with magnets. The one I made features a photo of a beach landscape. Your photo should be of somewhere you enjoyed visiting or something you enjoyed doing during the summer break from school. Hang it on your wall and you'll remember what you did on your summer vacation long after that report is
People are also reading…
forgotten.
I found directions for this beach bulletin board at Better Homes and Gardens at www.bhg.com on the Web and modified them for our use. The project requires water decal paper that I was able to find at www.decal-paper.com on the Web. I ordered paper for both laser and inkjet printers so I could decide the best way to complete this project. The company has water decals for most craft projects in both
8-by-10-inch and
11-by-14-inch sizes.
My first attempt at removing the decals from the paper backing on copies I printed on my home computer was disappointing, to say the least. I didn't seal the image with varnish before I soaked it in water. As I watched the image float off the page and dissolve, I remembered a lesson that I learned in school. When all else fails, READ THE DIRECTIONS!
The size of the sheet metal and frame you need will be determined by the size of the decal paper you use for your photo. I found this frame in a bargain bin, probably placed there because the glass (which I didn't need) was missing.
Supplies you will need include:
- Precut sheet metal the same size as your copy paper.
- Frame.
- Picture mat, if
necessary.
- Water decal paper.
- Computer.
- Printer.
- Clear spray varnish.
- Sea shells or vacation trinkets and craft glue (optional).
Determine what size bulletin board you want to make and purchase sheet metal and frame at a craft store.
Scan a photo from your computer and size it for an
8-by-10-inch or 11-by-14-inch copy. Print a copy of the photo onto the kind of paper that is compatible with your printer. Allow a few minutes for the image to dry then lightly but thoroughly spray with a clear spray varnish to seal.
Or, copy the image to a disc and take it and the paper to a copy store. Take a few extra sheets in case they need to make adjustments. (As insurance, I had them make a few copies of my image, in case I had difficulty mounting the decal on the metal.) There is no need to seal the copied image.
Soak and remove the paper backing from the decal following manufacturer's directions and mount on the sheet metal.
Use a paper towel to smooth the decal to remove air bubbles.
Place the metal sheet inside the frame, mat if necessary, and hang.
If you like, use a craft glue or low-temp glue gun to decorate the frame with sea shells or trinkets.


